Learn how to do squats correctly with our expert guide. We break down proper form, common mistakes, and how to use technology to master your technique.
Before you even think about dropping into a squat, you need to nail the setup. A good squat isn't just about bending your knees and standing back up; it’s built on a solid foundation, just like a house. Get the setup wrong, and the whole lift can feel weak, unstable, or just plain wrong. This initial phase is where you build the stability you need for a safe and powerful squat.
Building Your Perfect Squat from the Ground Up
Your squat starts the moment you step up to the bar—or even before you add any weight at all. Creating a stable base, generating tension from head to toe, and keeping your torso rigid are non-negotiable. This setup isn’t just a formality; it's what separates an effective, muscle-building squat from one that just puts your joints at risk.
Find Your Ideal Stance
Everyone's squat stance will be a little different because every body is different. A solid place to start is with your feet just a bit wider than your shoulders. Turn your toes out slightly—anywhere from 5 to 15 degrees usually feels right for most people.
This isn't just about what feels comfortable; it's about getting the right muscles to fire. Ever feel like your squats are all quads and knees? Your stance might be the culprit. A biomechanical review actually showed that a medium-to-wide stance can boost glute activation by 13% to 61% compared to a narrow one. It also dials down the work your calves have to do by 18%, helping you drive power from your hips where it counts.
Pro Tip: Not sure what your best stance is? Try this: do a few vertical jumps and pay attention to how your feet naturally land. That landing position is often your body's strongest and most stable base for squatting.
To make this even easier, here’s a quick checklist to run through before you start your set. Think of it as your pre-flight check for every single squat.
Your Pre-Squat Setup Checklist
| Body Part | Action | Why It Matters |
|---|---|---|
| Feet | Place slightly wider than shoulders, toes out 5-15°. | Creates a stable base and allows for better hip mobility. |
| Hips | Find a neutral position, ready to hinge back. | Sets you up to initiate the movement correctly. |
| Core | Take a deep belly breath and brace like you’re about to be punched. | Creates intra-abdominal pressure to protect your spine. |
| Upper Back | Pull shoulder blades down and back. | Keeps your chest up and prevents your torso from collapsing. |
| Chest | Keep it proud and pointing forward. | Helps maintain an upright posture throughout the lift. |
Run through these cues every time, and you'll build the muscle memory for a perfect setup without even thinking about it.
Create Full-Body Tension
With your feet planted, it's time to get tight. This isn't about being stiff and robotic; it's about creating stability so you can move with intention and power.
- Brace Your Core: Forget sucking in. Take a big breath into your belly, pushing your stomach out against your shirt. Then, tighten your abs hard. This creates the intra-abdominal pressure needed to support your spine.
- Engage Your Upper Back: Think about pulling your shoulder blades down into your back pockets. This keeps your chest from caving in as you descend and ensures your upper body stays solid.
This full-body bracing turns a simple leg exercise into a true total-body lift. It’s how you transfer force from the ground all the way through the bar. This setup is just as important as the squat itself and should be a key part of your pre-lift routine. If you need some ideas, check out our guide on how to warm up before strength training to get your body primed and ready.
Alright, you've got your setup dialed in. Now for the main event: the squat itself. The movement is broken down into two parts—the descent (the "eccentric" or lowering phase) and the ascent (the "concentric" or lifting phase). Getting the rhythm right here is what transforms a simple up-and-down motion into a powerhouse exercise.
Think of the descent as a controlled "sit back," not a clumsy drop. You’re aiming to coil your hips and legs like a spring, ready to explode back up.
The Controlled Descent
The movement starts by breaking at the hips and knees at the same time. A great cue is to imagine you're about to sit in a chair that’s just a little too far behind you. This simple trick forces you to hinge your hips backward as your knees bend, which is exactly what we want. It ensures the weight is shared across your glutes and hamstrings, not just dumped onto your knees.
That braced core and tight upper back you created during the setup? They’re your best friends on the way down. This tension is what stops your torso from collapsing forward, a super common mistake that puts a ton of unnecessary strain on the lower back. Keep that chest held high and pick a spot on the wall in front of you to stare at.
 This process is non-negotiable. Your stance, brace, and torso position have to be locked in before you even think about starting the descent.
So, how deep do you go? While the textbook answer is "thighs parallel to the floor," the real answer depends on you. Go as deep as your mobility allows without your heels lifting off the ground or your lower back starting to round. That’s your sweet spot.
The Powerful Ascent
Once you hit the bottom of your squat, it’s time to drive up with power and control. This isn't the time to relax; you’re unleashing all that energy you stored on the way down.
To kick off the ascent, think about aggressively pushing the floor away from you. Drive through your entire foot—your heel, big toe, and little toe. This "tripod foot" concept gives you a rock-solid base and stops you from rocking forward onto your toes, which is an easy way to lose balance.
Lead with your chest on the way up, not your hips. You want your hips and shoulders to rise at the same time. If your hips shoot up first, your chest will drop, turning the movement into a "good morning" and putting your lower back in a really vulnerable position.
- Drive Up: Push through your whole foot as if you're trying to push the floor down.
- Chest Up: Keep your torso upright. Imagine someone has a string attached to your chest, pulling you up.
- Glute Squeeze: As you reach the top, squeeze your glutes hard to bring your hips forward and lock out the movement.
Following this sequence makes sure you’re using the big, powerful muscles in your legs and hips to do the work. If you're planning on adding weight, these mechanics become even more critical. We dive deeper into this in our guide on barbell back squats.
Your Breathing Pattern
Breathing isn't just about staying conscious—it's a tool for creating stability. For squats, there’s a simple but incredibly effective pattern to follow:
- Inhale at the top: Before you even start to move, take a big breath deep into your belly and brace your core against it.
- Hold during descent: Hold that breath as you lower yourself into the squat. This builds intra-abdominal pressure, which acts like a natural weightlifting belt to protect your spine.
- Exhale on ascent: As you start driving up from the bottom, exhale forcefully.
This technique, often called the Valsalva maneuver, is key to keeping your torso rigid and safe when the lift gets tough.
Common Squat Mistakes and How to Fix Them
Look, even the most seasoned lifters can let small technical flaws creep into their squats. We're all human. The key to long-term progress is knowing how to spot these common errors and, more importantly, how to fix them before they turn into bad habits that could lead to injury.
Let’s walk through the most frequent issues I see and turn those weak points into rock-solid strengths.

Knees Caving Inward
This is probably the most common form breakdown I see in the gym: knee valgus. It’s that moment during the ascent or descent when your knees decide to collapse inward toward each other. Not only does this rob you of power, but it puts a ton of unnecessary stress on your knee ligaments.
Most of the time, this points to weak glute medius muscles—the ones on the side of your hips responsible for keeping your thighs aligned. To combat this, think about actively "spreading the floor" with your feet. Another cue that works wonders is to imagine you’re trying to screw your feet into the ground, pushing outward.
A fantastic drill is to place a mini-band just above your knees during bodyweight squats and focus on pushing your knees out against the band's resistance. This really helps wake up those lazy glutes. If you're dealing with nagging knee discomfort, you might also want to check out these knee-friendly leg exercises to build up supporting strength safely.
Heels Lifting Off the Floor
Are your heels peeling off the floor as you sink into your squat? That's a dead giveaway that your weight has shifted too far forward onto your toes. This can be caused by a couple of things, but it often comes down to limited ankle mobility or simply initiating the squat by bending your knees first instead of sitting your hips back.
The fix here is to get grounded. Before you even start moving, consciously root your feet to the floor by pressing your big toe, little toe, and heel down hard. Think of it as creating a stable "tripod." Focus on driving through your mid-foot and heel on the way up.
If you know ankle tightness is the real enemy, you can place small weight plates under your heels as a temporary crutch. This helps you achieve depth while you work on your ankle flexibility with targeted mobility drills.
The Dreaded Butt Wink
"Butt wink" is that ugly little tuck of your pelvis that happens at the very bottom of the squat, causing your lower back to round. This lumbar flexion is something we want to avoid, as it can place unwanted stress on your spinal discs. It’s usually a sign that you've squatted deeper than your current mobility allows or that your core isn't braced hard enough.
The best immediate fix is to check your ego and reduce your squat depth. Film yourself and find the exact point where your pelvis starts to tuck under—then stop your descent just before that. That's your current "safe" range of motion.
Over time, you can work on improving hip and ankle mobility and mastering your core bracing to gradually earn a deeper, safer squat.
Leaning Too Far Forward
If you look in the mirror and your chest is dropping so much that your torso becomes almost parallel to the floor, you’re turning your squat into a "good morning." This dangerous mistake shifts the load from your powerful legs directly onto your vulnerable lower back.
This issue often stems from a weak core, tight hips, or an underdeveloped upper back that can't hold an upright position under load. Your best friend here is the cue to "keep your chest proud." Imagine there's a logo on your shirt and you have to show it to someone standing in front of you for the entire rep.
Bolstering this with accessory work like planks and heavy rows will build the core and upper back strength needed to maintain that proud, upright posture.
Squat Troubleshooting Guide
It can be a lot to remember in the heat of a set. Here’s a quick-reference table to help you diagnose and fix these common squat faults on the fly.
| Common Mistake | Likely Cause | Quick Fix or Cue |
|---|---|---|
| Knees Caving In | Weak glutes, poor motor control | "Spread the floor" or use a band |
| Heels Lifting | Poor balance, tight ankles | "Drive through your mid-foot" |
| Butt Wink | Limited mobility, going too deep | Reduce depth and work on mobility |
| Leaning Forward | Weak core or upper back | "Keep your chest proud" |
Think of this table as your pocket coach for dialing in perfect form.
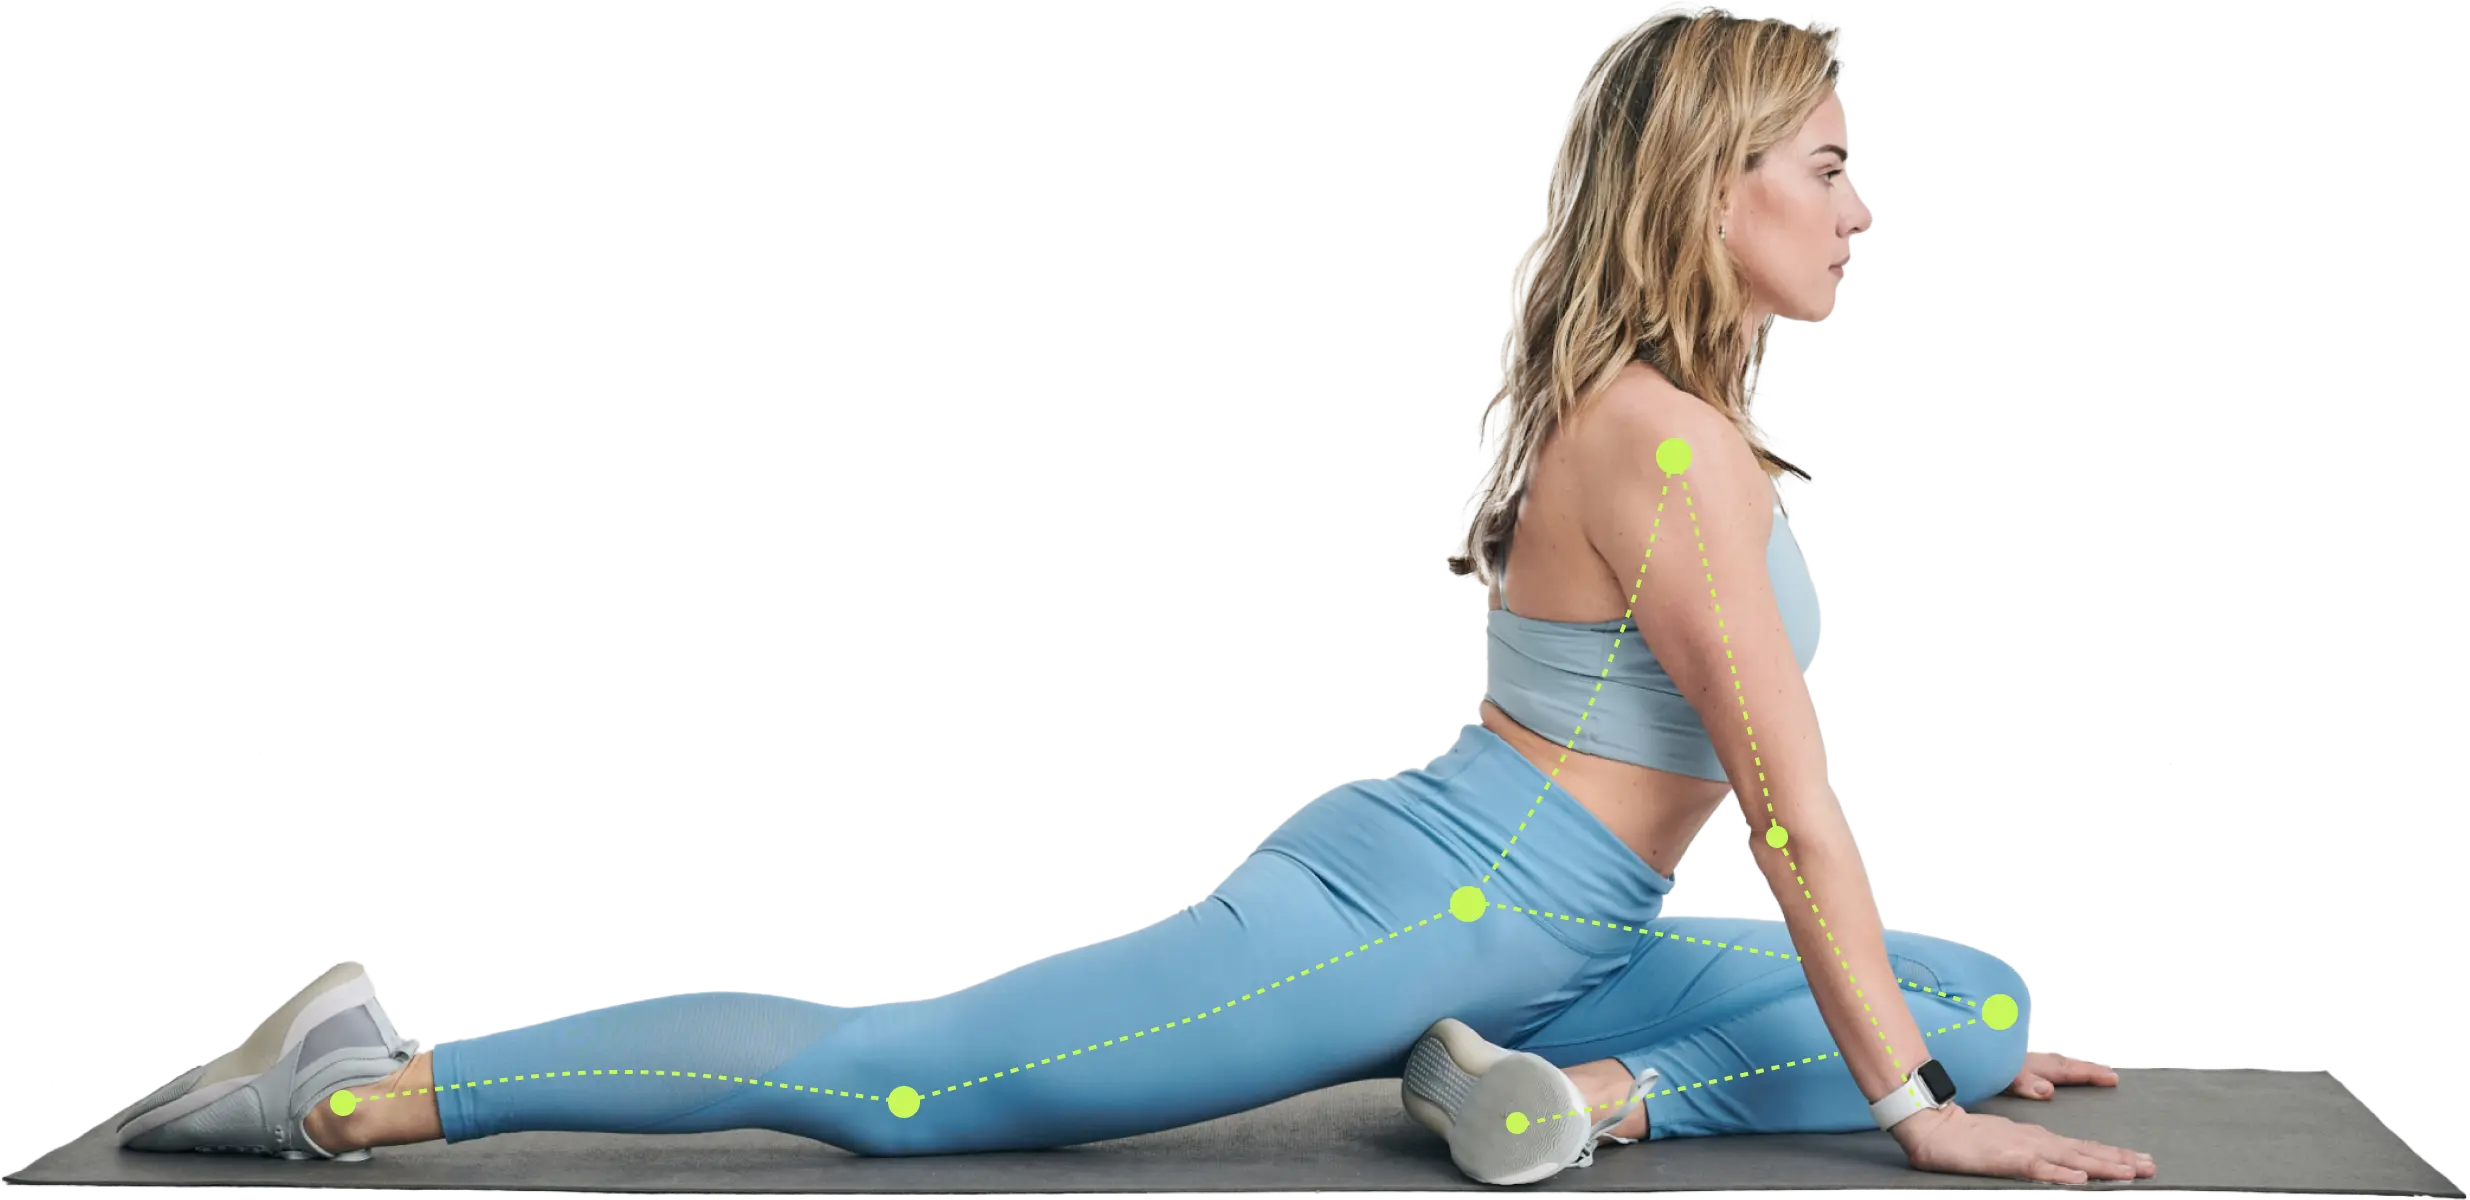
Having an objective eye on your form is a game-changer. This is where tools like the Zing Coach app really shine. Its computer vision technology acts like a virtual spotter, analyzing your movement and giving you instant feedback on these exact issues. It helps you catch and correct mistakes from one rep to the next.
Unlocking Your Squat with Mobility Drills
You can have the most technically perfect squat in the world on paper, but it won’t mean much if your body isn't ready to perform the movement. If you find yourself struggling to hit depth, your heels pop up, or you feel a nagging strain in your lower back, a lack of mobility is almost always the real culprit.
This isn't about adding hours of stretching to your week. Just a few targeted drills before you lift can make a night-and-day difference. We're going to focus on the big three areas that hold back most people's squats: your ankles, hips, and thoracic spine (that's your upper and mid-back).

Mobilize Your Foundation
Before you even think about putting a bar on your back, you have to prep your joints for the job ahead. A few minutes spent here will pay off big time when it comes to your form.
- Ankle Rockers: Tight ankles are the number one reason heels lift off the floor. Get into a half-kneeling position and gently drive your front knee forward over your toes, keeping that heel glued to the ground. Rock back and forth for 10-15 reps on each side.
- Hip Flexor Release: When your hip flexors are tight, they can tilt your pelvis forward, making it nearly impossible to keep your spine neutral. A deep lunge stretch is your best friend here. Focus on tucking your tailbone and really squeezing the glute of your back leg. Hold it for 30 seconds per side.
- Thoracic Rotations: A stiff upper back is a fast track to a collapsed chest in the squat. Get on all fours, place one hand behind your head, and rotate that elbow down toward your opposite wrist. Then, open it all the way up toward the ceiling. Do 8-10 rotations on each side.
If you want to build a more comprehensive warm-up routine, exploring various drills can give you more movements to play with.
Activate the Right Muscles
Once your joints are moving freely, it’s time to wake up the muscles that will actually stabilize and power your squat. This is about making sure the right players show up for the game.
Key Insight: Activation isn't about fatiguing the muscles; it’s about establishing a strong mind-muscle connection. You’re simply reminding your glutes and core what their job is before you ask them to handle heavy loads.
Try these two super simple but effective activation drills:
- Glute Bridges: Lie on your back, bend your knees, and plant your feet flat on the floor. Drive through your heels and squeeze your glutes hard to lift your hips toward the ceiling. Hold for a solid two-second count at the top before you lower back down. Go for 15-20 reps.
- Banded Side Steps: Slip a mini-band around your ankles or just above your knees. Get into a slight athletic stance with your knees and hips bent. Take slow, deliberate steps to the side, fighting to keep tension on the band the whole time. Do 10-12 steps in each direction.
This quick, targeted warm-up gets your body primed and ready, making it so much easier to squat correctly. If you're looking for an even bigger mobility and stability challenge, you might want to check out our guide on the revolved deep squat.
How Technology Can Perfect Your Squat Form
Knowing what a good squat looks like is half the battle. Executing one perfectly, rep after rep, is a whole other challenge—especially when you’re training alone.
This is where fitness tech can be a game-changer. Instead of second-guessing your form, you can get objective feedback in real time, turning your phone into a training partner that never misses a detail.
The Zing Coach app, for instance, uses computer vision to watch your form through your phone’s camera. As you squat, it tracks key points on your body to count your reps accurately and—more importantly—give you immediate corrections on your technique.
It's like having a coach right there with you, calling out adjustments mid-set. If your knees cave in or your chest drops, the app flags it, helping you build solid movement patterns right from the start.
Personalized Plans and Smart Progression
But good coaching is more than just fixing form on the fly. Real, lasting progress comes from a plan built around your unique body and current fitness level.
Before you even attempt your first squat with the app, Zing Coach runs you through an initial fitness assessment and a body scan. This isn't just for show; it gathers crucial data on your strength, mobility, and body mechanics.
That information is then used to build a training plan that’s actually personal to you. It makes sure the squat variations and volume are just right—challenging enough to force adaptation but safe enough to build your confidence and avoid the all-too-common mistake of doing too much, too soon.
And as you get stronger, the app grows with you. It might progress you from bodyweight squats to goblet squats or adjust your rep targets. This smart progression is key to breaking through plateaus and keeping your training effective. You can get a deeper look into how it all works in our guide to an AI-powered workout app.
Building Confidence with Every Rep
Ultimately, having this kind of technology in your corner removes the doubt that can hold you back. You're no longer left wondering:
- "Am I going deep enough?"
- "Is my back rounding?"
- "Are my heels lifting?"
With clear, data-driven answers, you can stop overthinking and start focusing on your effort. This ensures every single squat is a quality rep that gets you closer to your goals, all while keeping you safe from injury.
Frequently Asked Questions About Squatting
Even with the best guide, some questions always pop up when you're dialing in your squat. Let's clear up a few of the most common hurdles people face. Getting these sorted will help you squat with more confidence and precision from day one.
How Deep Should My Squat Be?
The "perfect" squat depth is different for everyone. It really comes down to your personal goals and, more importantly, your current mobility.
For general fitness and building muscle, a great goal is to get your thighs at least parallel to the floor. Hitting this depth makes sure your quads and glutes are doing the heavy lifting.
But here’s the key: never chase depth at the expense of good form. If you feel your lower back start to round (what many call the “butt wink”) or your heels lift off the ground, you’ve gone too far for your current mobility. That’s your body’s signal to stop the squat just before that point.
A fantastic way to feel out proper depth is to practice squatting down to a box or a bench set at a height where your thighs are parallel. It gives you a physical target and teaches your body what that position feels like.
Is It Bad If My Knees Go Past My Toes?
This is one of the most stubborn myths in the fitness world. The short answer is no, it’s not inherently bad.
For a lot of people, especially those with longer thigh bones (femurs) relative to their shins, it's completely natural and necessary for the knees to travel slightly past the toes. Trying to actively prevent this can actually put unwanted stress on your hips and lower back.
What really matters is your balance. Your weight should stay centered over your mid-foot through the entire movement. As long as your heels are glued to the floor, a little forward knee travel is perfectly safe.
What If I Feel Knee Pain When I Squat?
Knee pain during a squat is a major red flag. Think of it as your body's alarm system telling you something is off—it could be your technique, an underlying issue, or just too much weight too soon.
Common culprits are knees collapsing inward, shifting your weight onto your toes, or simply trying to go too heavy before you’re ready.
First things first: stop what you're doing and check your form. If you can, film yourself from the front and side to spot any obvious issues. Try dropping the weight or just using your bodyweight to see if the pain goes away.
If the pain sticks around, it's critical to stop the exercise and talk to a physical therapist or doctor. They can help figure out the root cause and give you a solid plan to get back to squatting pain-free.
Ready to stop guessing and start squatting with confidence? Zing Coach uses AI-powered computer vision to analyze your form, count your reps, and provide real-time feedback. Get a personalized training plan that adapts as you get stronger, ensuring every workout is safe and effective. Download Zing Coach and let technology perfect your technique.